Zeroing a scope is one of the essentials of owning a rifle. It is quite easy and accessible even to beginners, despite the persistent myth that you need to be a pro to do it.
Due to the belief that zeroing a scope is complicated and requires lots of experience, many people tend to rely on others they perceive as more capable or knowledgeable to do it for them. Relying on external sources for something you can learn yourself keeps you in a dependent state, using your time and money to accomplish something that is within your reach.
It also prevents you from learning and growing as a gun owner, and self-reliant individual in general.
The truth is, there is no need to consider any task as more complicated than it is and admit defeat without even trying. Zeroing a scope is quite simple, and learning this skill will increase your mastery of firearms.
This article will give you a step-by-step tutorial on how to do it so that you become the knowledgeable individual other people come to for advice.
What does zeroing a scope mean?
In specific terms, zeroing means that you’re aligning the vertical axis of your scope in order to be able to aim accurately at a specific distance. Zeroing is often used interchangeably with sighting in by shooters.
While in actuality there is a slight difference, they essentially have the same meaning in modern use. That is, to adjust the point of aim to match the rifle’s point of impact at a given range. Or in other words, to ensure that your rifle is going to hit what you’re aiming at.
Prerequisites to Zeroing a Scope
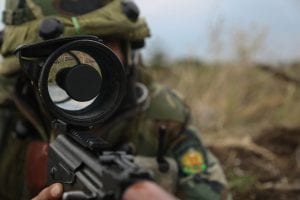
If you’re going to zero a scope, first, you need to have a rifle that can be accurate enough. And obviously, you also need a scope. Once you have a firearm and a scope, the scope should be mounted correctly on your weapon.
Then, you need a target. As long as it has a small bull’s eye, it will do, though you can also use targets specially designed for zeroing for optimal results. Additionally, items such as a boresighting kit and a gun vise can prove very useful and make your life easier. At the very least, you’re going to need a good rest, such as some sandbags.
Lastly, you need to select the distance at which you’re going to zero your gun, and have a way of measuring that distance. A good distance to zero your scope is 100 yards. The majority of scopes are calibrated to suit that range, plus most shooting ranges are set up for that distance. If the target is too close, it could prevent you from noticing problems. On the other hand, if it’s too far, it might skew the results due to environmental factors such as the wind.
A distance of 100 yards offers a good compromise.
However, if you favor zeroing at a longer distance, you’ll need to have a higher point of impact on the target at 100 yards, and subsequently confirm it at your chosen range. To determine how much higher you need to place it with your specific set up, there are apps and charts on rifle ballistics you can find online.
Boresighting
To start with, the scope should be boresighted to your rifle. This is something you can do by yourself, in which case using a boresighting kit is recommended. But if you’re not comfortable with it, you can also have it done by your local gun store, which they usually do at no charge.
What is boresighting exactly? It’s a preliminary method that’s going to help you zero your rifle. This process is meant to pre-align your rifle’s barrel’s bore axis with the target. Basically, it’s done to ensure that your gun is sighted in accurately, with or without a scope.
To boresight, mount the scope on your firearm if you haven’t already. Pick a target at close range, say 25 yards, and align your scope’s crosshair with the boresight laser’s red dot. It’ll only take you a few minutes and can save you time and ammunition at the range.
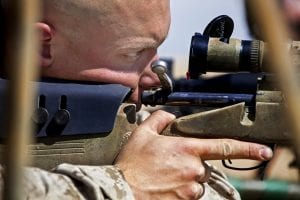
Proper Rest
To zero a scope correctly, you’re going to need to have a proper rest. The rest needs to support the weight of the rifle entirely. Zeroing a scope consists in adjusting a precision instrument, which means that human input should be reduced as much as possible for maximum precision.
If you try to hold the gun yourself, you’ll cause movement and instability.
What’s a proper rest exactly? A shooting bench, sand bags are perfect for this. Avoid using an improvised, mediocre rest, such as a backpack, rolled up blankets, or the hood of your car if possible.
Make sure to support the forend and stock of the rifle. Don’t make the mistake of supporting the barrel, stick to the forend. Ideally, the rest should be sturdy but with a slight give, like sandbags.
How to Shoot
Let’s review more in depth how you’re going to take the shots to zero your scope. Use your scope’s highest power. Carefully aim for the center of the target before firing. If the shot hits the paper, fire two more times. That’s three shots total.
Firing three shots ensures everything’s going well with the rifle, and you’re using correct shooting technique. It will show you any issues right off the bat.
If you only shoot once, you might not detect problems with your rifle’s accuracy, or you might be flinching, etc. and end up wasting a fair amount of time trying to hit the target at all.
If the three shot group is close enough, each shot less than two inches apart, you’ll know your gear is functioning as it should and you’re using proper shooting technique.
At this point, it’s more about grouping the shots than being accurate in relation to your point of aim. That is, you should strive to have the same point of aim for all three shots. For instance, even if they all end up to the left, it’s fine as long as they land close to one another.
If the discrepancy between the shots is too large, there is a problem either with your equipment or your shooting technique. In that case, stop shooting and correct the issue before moving on with zeroing the rifle. When adjusting the scope, be slow, attentive, and precise. It’s easy to forget how many clicks you’ve adjusted the turret.
Target Progression
As mentioned previously, 100 yards is the most common zeroing distance. If you’re not sure this distance is fit for your gun, check the owner’s manual or manufacturer’s website. We’re going to start closer and progressively work up to that zero distance.
Assuming a 100 yard zero, start by setting a target at about 25 yards at the range. You should have a set of sandbags to steady your shot, or an otherwise adequate rest.
For this first target, you don’t need to hit a bull’s eye, but be fairly close. Once you’re hitting near the bull’s eye, you can increase the distance. Set the second target at 50 yards.
This time, you should be shooting the center of the bull’s eye. However, if your shot misses the paper entirely for a couple of rounds, you should set the target back a bit, to a 30 yard distance and try again. Once you’re close enough to the bull’s eye at 50 yard, set a target at your zero distance, 100 yards in this case.
If you want to go for a shorter zero, you can use the same steps as described. Start at ¼ of the zero distance, then ½ of it on the second target, and finally the full distance. If you’re looking at a longer zero, it’s better to have a few more targets, for instance at 100 and 150.
Zeroing With a Gun Vise
A gun vise might come in handy when zeroing at 100 yards. If your rounds have been on target at 50 yards, it’s time to take it to the final step, 100 yard distance. That’s when a gun vise can help you take a steady shot. It holds the rifle in position with enough weight to prevent any undesirable movement. The gun vise won’t be necessary for shorter shots.
Ideally, you should zero your rifle on a day with little to no wind. Of course, depending on where you live, that might not be an option, and nature doesn’t obey the whims of man. But as much as you can, avoid wind as it can throw you off.
Set your scope on the smallest visible center of the bull’s eye. Take your time, be focused and steady, and take three shots as described above.
If all goes well, the shots will be in very close proximity to each other. If the shots are far apart, take a deep breath, re-center yourself, get in the right mindset before trying again. The impacts should form a solid group.
To zero with the vise, move the vise so the point of aim matches the original point of aim as closely as possible. Once this is done, adjust the scope to be in the center of the three shot group. Shoot another three times, it should hit the bull’s eye. This step can be repeated until you get the desired results.
Zeroing Without a Gun Vise
Not everyone has the luxury of having a gun vise. Don’t worry as it’s not an absolute necessity to zero a scope. If you don’t have one, you’ll simply have to go a little slower. The same distances for targets are used, and hopefully you have a set of sandbags. If you don’t have sandbags, make sure to keep your gun steady any way you can. But if you’re serious about learning to use a rifle, getting the proper equipment is a natural step to take.
Zeroing without a gun vise is done the same way, with three shot groups. Take a three shot group, and see how far off it is, in inches. Scopes generally adjust in Minutes of Angle, or MOA, which roughly correspond to one inch of distance per MOA adjusted. Most scopes work with ¼ MOA per click, but if you’re not sure, refer to your scope’s manual.
Begin with the horizontal orientation, using the knob present on the side of the scope. After determining how many inches you need to adjust, move the MOA accordingly toward the center of the bull’s eye.
Take another three shot group. It should now hit the center of the target, above or below the bull’s eye. This step should be replicated until your windage adjustment puts your shots where you want them. Once the horizontal alignment is good, it’s time to finally nail the zero.
In the same way you tuned the windage, adjust the top knob of the scope with the appropriate amount of clicks to hit the center of the bull’s eye. Fire three more times to check if you’re on target. If not, you’ll have to go back and keep fine tuning these parameters until you get the desired results.
After you get it right, you can shoot a few more three shot groups to confirm the zero. Plus, getting a little more practice doesn’t hurt. Finally, let the barrel cool off before firing one last group. It’s a way to ensure that your final point of impact is also adjusted from the cold barrel. Your first shot of the day is always fired from a cold barrel after all.
Zeroing a Scope Done Right
There you have it, you can now zero a scope like a pro. Don’t give in to frustration, remember that any difficulty encountered is an opportunity for learning and gives you more experience.
A fun experiment to try is to go to the range under different wind conditions after zeroing your scope. Fire a three shot group and note how well it does depending on the wind. After garnering some data, you’ll be able to tell how wind affects your shooting.
Happy shooting!