Do you think you can string a crossbow out of wood? The good news is you can!
There are few things most of us guys can agree on, but that beer is best served cold is one of them. Another is that wood crossbows are freakin’ awesome! Even more awesome is building a wood crossbow yourself. It doesn’t matter whether you’re an experienced woodworker or a hobbyist who enjoys taking on challenging, but rewarding projects. Here’s how you can make your very own crossbow out of wood!
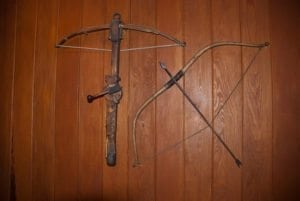
If these dudes can do it, you can do it!
Wood crossbows (well, all crossbows) have been around since ancient China, but came to Europe in the early medieval period. This technology changed the way that wars were fought. Unlike traditional archery, a crossbowman doesn’t need tons of training to have a lethal effect on the battlefield.
Wood crossbows were a great equalizer. Any able-bodied dude with steady aim could buy or make themselves a crossbow and join in the fight.
The advancement of projectile weapons was a big step forward in arms technology. These days, guns have replaced crossbows in military applications. However, these sophisticated bows are still popular with hunters looking to test their skill come hunting season.
Know your Wood Crossbow
To build a wood crossbow, you’ll need to know how they work. The main part of a wooden crossbow is called the stock (or tiller). This should be made from the hardest wood you can get your hands on. The stock is where the limbs will be attached and where the greatest forces will be experienced. Hickory or ash is best, as these are strong woods with excellent elasticity.
The “bow” part of the wooden crossbow is a lath, also known as a prod. Traditionally, they have been made with horn, wood, or layered sinew. In 1330, steel replaced the other variants as the material of choice.
If you’re using a hand-cocked wood crossbow, it will have a stirrup. The stirrup in front is a frame that allows the user to cock the bow by hand. It can be attached with a string, bolted on, or kept in place with bow irons. If you use string to bind the stirrup, it may become loose and eventually need to be rebound.
That pretty much covers the body of the bow. Then there’s the actual firing mechanisms, which send the projectile flying into a target or game. The trigger, for example, can be made from just about anything. Use the same wood for both the stock and trigger to give the finished crossbow a nice aesthetic.
Make your bolts
It’s a good idea to purchase your arrows/bolts (or make them) before you start work on the body of the wood crossbow. This may seem like “putting the cart before the horse,” but this step makes things fit together more snuggly in the long run. You can make the dimensions fit around the bolt.
A 20 inch bolt made of ash or oak is ideal. Get to whittling and sanding! You’ll then need to thread on a flint or obsidian tip. For the flights, goose feathers work perfectly.
Getting started
Image credit via Flickr Creative Commons: Thomas Q.
The first thing you’ll need to do it measure and cut the wood for the stock. The length should be comfortable for your arms. The longer the stock is, the more powerful the wood crossbow will be.
Next, grab your bolts and place them on the stock. Leave a little clearance for the tip and mark the spot where the bolt ends (the release point). Make another mark 2 inches further back for clearance. The bolt will rest in the “shelf,” so mark a line 1 inch deep parallel to the top of the stock. Cut this piece out.
Imagine this is the barrel of the gun. Cut a notch into the shelf the whole way down the “barrel” for the bolt to rest in.
Next is the trigger. You will need to make a 2 inch diameter hole 1 ½ inches directly below the release point. After you cut the string and trigger holders, you’ll be placing a 2 inch circular piece of hard wood into this hole. This is the roller nut. It’s shape should resemble a button mushroom, with the “stem” of the mushroom at right angles to the head and the side where the string is held. The slight curve enables it to hold the withdrawn string in place.
Building the trigger end
The grip will be just below the trigger, about an inch closer to the end. Once you see it coming together, you’ll get a feel for where it should go. The board should be around 4 inches X 6 inches and 1 inch thick, but as long as you remove an equal size piece from the stock you can use whatever size you see fit.
Fashion the grip of the trigger to your liking. Place a pin in the top corner so the trigger can pivot and release the mechanism. A simple 1/2 inch hole with a 1/2 inch pin made of any leftover wood is fine.
For the rest of the trigger end of the wood crossbow, it’s up to you to decide what you want to do. You can keep it simple or play around with making hand grips, a shoulder rest, or whatever else takes your fancy.
Constructing the bow
You can construct the lath from wood, too! A piece of ash around 30 inches long makes a strong lath that’s easy to work with. Keep in mind that it can also make the crossbow quite large.
The wood should be as thick as the stock where the two parts meet. Aim for around 1 ½ inches. This will give you good power for projecting the bolt without making it too hard to actually draw back. Taper the limbs off to approximately 1/2 inch at the ends.
You can make your own bowstring using the continuous loop method, or simply purchase crossbow string. Not only will this save time, but it reduces the risk of the string snapping. A snapped string under draw force will really put a dampener on your day.
Cut a 1 ½ inch groove into the end of the stock and attach the lath with wood glue. Attach the string. Pull the string back and hook it behind the string holder of the trigger. At this stage you are dealing with a very dangerous weapon (cool!). Please wear eye protection and ensure other people are at a safe distance before testing your crossbow. Check out this post for some recommendations on great archery targets.
Finish off your bow with a lot of sanding, staining, and oiling. Those little flourishes will add personality and really make it your own. Good luck and stay safe!